- Overview
- Installing Theme and Plugins
- Demo Content Installation
- Getting Started
- Theme Options
- Sidebars / Widgets
- Setting the slider
- Setting the pages
- Setting the Blog
- Setting the Portfolio
- Setting the Team Members
- Setting the Testimonials
- Setting the Client's Logo
- One-page site
- Visual Composer
- Elementor
- Setting WPML Multi-Lanuage
- Translation
- Shortcodes
- FAQ
- Sources / Credits
FAQ
Freqently Asked Questions
This page contains solutions for general questions
Questions List
Q1: How to set Contact Forms alike Demo site ?
A1: You can easily set Contact Form alike form shown on our demo site. Here are list of forms used on our demo site.
Sample code for make a Appointment Form used on Homepage 2 of Brivona demo site.
<div class="tm-commonform tm-make-appoint-form2">
<div class="row">
 <div class="col-md-6"><div class="field-group"><i class="tm-skincolor ti-user"></i>[text* your-name placeholder "Full Name"]</div></div>
 <div class="col-md-6"><div class="field-group"><i class="tm-skincolor ti-mobile"></i>[email* your-email placeholder "Email Address"]</div></div>
</div>
<div class="row">
 <div class="col-md-6"><div class="field-group"><i class="tm-skincolor ti-email"></i>[text* your-phone placeholder "Phone"]</div></div>
 <div class="col-md-6"><div class="field-group"><i class="tm-skincolor ti-heart-broken"></i>[select service "Select Department" "Orthopadic" "General"]</div></div>
</div>
<div class="row">
 <div class="col-md-6"><div class="field-group"><i class="tm-skincolor ti-calendar"></i>[text* date class:hasDatepicker placeholder "Appointment Date"]</div></div>
  <div class="col-md-6"><div class="field-group"><i class="tm-skincolor ti-timer"></i>[text* your-time placeholder "Appointment Time"]</div></div>
</div>
<div class="">[submit class:tm-vc_general class:tm-vc_btn3-shape-square class:tm-vc_btn3-color-skin "GET A FREE CONSULTATION"][response]</div>
</div>
Sample code for Make an Appointment Form used on Contact Us page of Brivona demo site.
<div class="tm-contactform tm-commonform">
<div class="row">
<div class="col-xs-12">
 <div class="field-group"><i class="ti-user"></i>[text* your-name placeholder "Your Name"]</div>
</div>
<div class="col-xs-12">
<div class="field-group"><i class="ti-mobile"></i>[text* your-phone placeholder "Cell Phone"]</div>
</div>
<div class="col-xs-12">
 <div class="field-group"><i class="ti-email"></i>[email* your-email placeholder "Email"]</div>
</div>
<div class="col-xs-12">
 <div class="field-group"><i class="ti-pencil"></i>[text* your-email placeholder "Subject"]</div>
</div>
</div>
<div class="row">
<div class="col-xs-12 col-sm-12">
 <div class="field-group"><i class="ti-comment"></i>[textarea* message placeholder "Message"]</div>
</div>
</div>
<div class="row">
  <div class="col-xs-12 col-sm-12 tm-book-submitbt">[submit class:tm-vc_general class:tm-vc_btn3 class:tm-vc_btn3-style-flat class:tm-vc_btn3-size-md class:tm-vc_btn3-color-skincolor "Send Message"]</div>
 </div>
</div>
Sample code for Make an Appointment Form used on Contact Us 2 page of Brivona demo site.
<div class="tm-commonform tm-contactpage-form">
<div class="row">
  <div class="col-md-6"> <label>Full Name *</label>[text* your-name ]</div>
  <div class="col-md-6"><label>Your email *</label>[email* your-email]</div>
</div>
<div class="row">
 <div class="col-md-6"><label>Your Phone *</label>[text* your-phone]</div>
 <div class="col-md-6"><label>I'm interested in *</label>[text* your-sub]</div>
</div>
<div class="row">
 <div class="col-md-12"><label>Your Message *</label>[textarea* message 20x6]</div>
</div>
<div class="">[submit class:tm-vc_general class:tm-vc_btn3 class:tm-vc_btn3-style-flat class:tm-vc_btn3-shape-square class:tm-vc_btn3-color-skincolor "SEND-MESSAGE"][response]</div>
</div>
Sample code for Contact Me Form used on Doctor Details page of Brivona demo site.
<div class="tm-commonform tm-team-form">
<div class="row">
 <div class="col-md-6">[text* your-name placeholder "Name*"]</div>
 <div class="col-md-6">[email* your-email placeholder "Email*"]</div>
</div>
<div class="row">
 <div class="col-md-6">[text* your-subject placeholder "Subject*"]</div>
 <div class="col-md-6">[text your-phone placeholder "Phone"]</div>
</div>
<div class="row">
 <div class="col-md-12">[textarea* your-message 40x10 placeholder "Message*"]</div>
</div>
<div>
     [submit class:tm-vc_general class:tm-vc_btn3 class:tm-vc_btn3-style-flat class:tm-vc_btn3-
     shape-square class:tm-vc_btn3-color-skincolor "Send Message"]
       [response]
 </div>
</div>
Q2: How to update Brivona theme?
A2: We are providing regular bug fixes, enhancements and also features to our all buyers. So we are releasing new version frequently. The theme update process is handled by the Envato Market Plugin plugin. Click here to know how to setup Envato Market Plugin. You can download the plugin by clicking here.
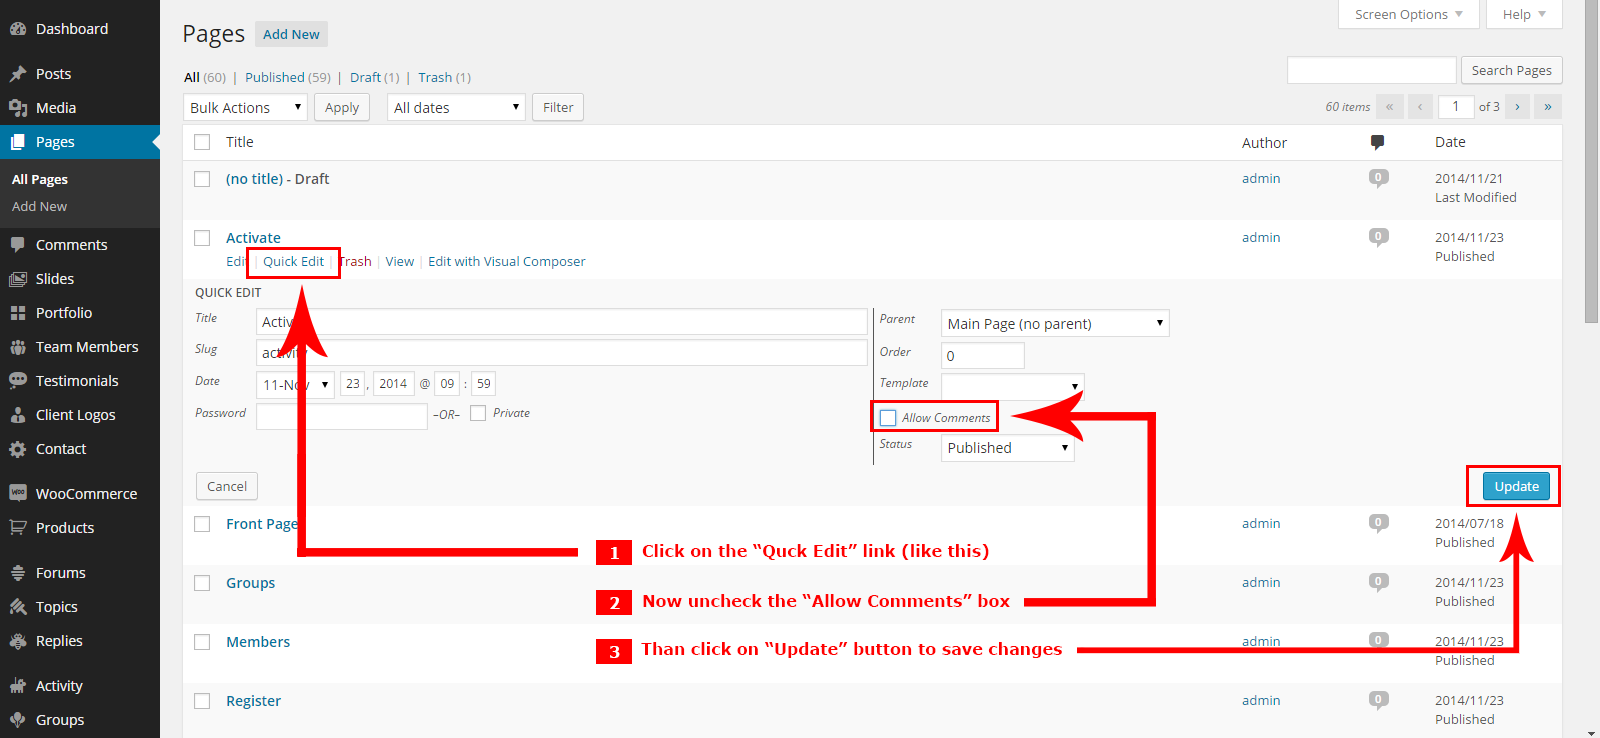
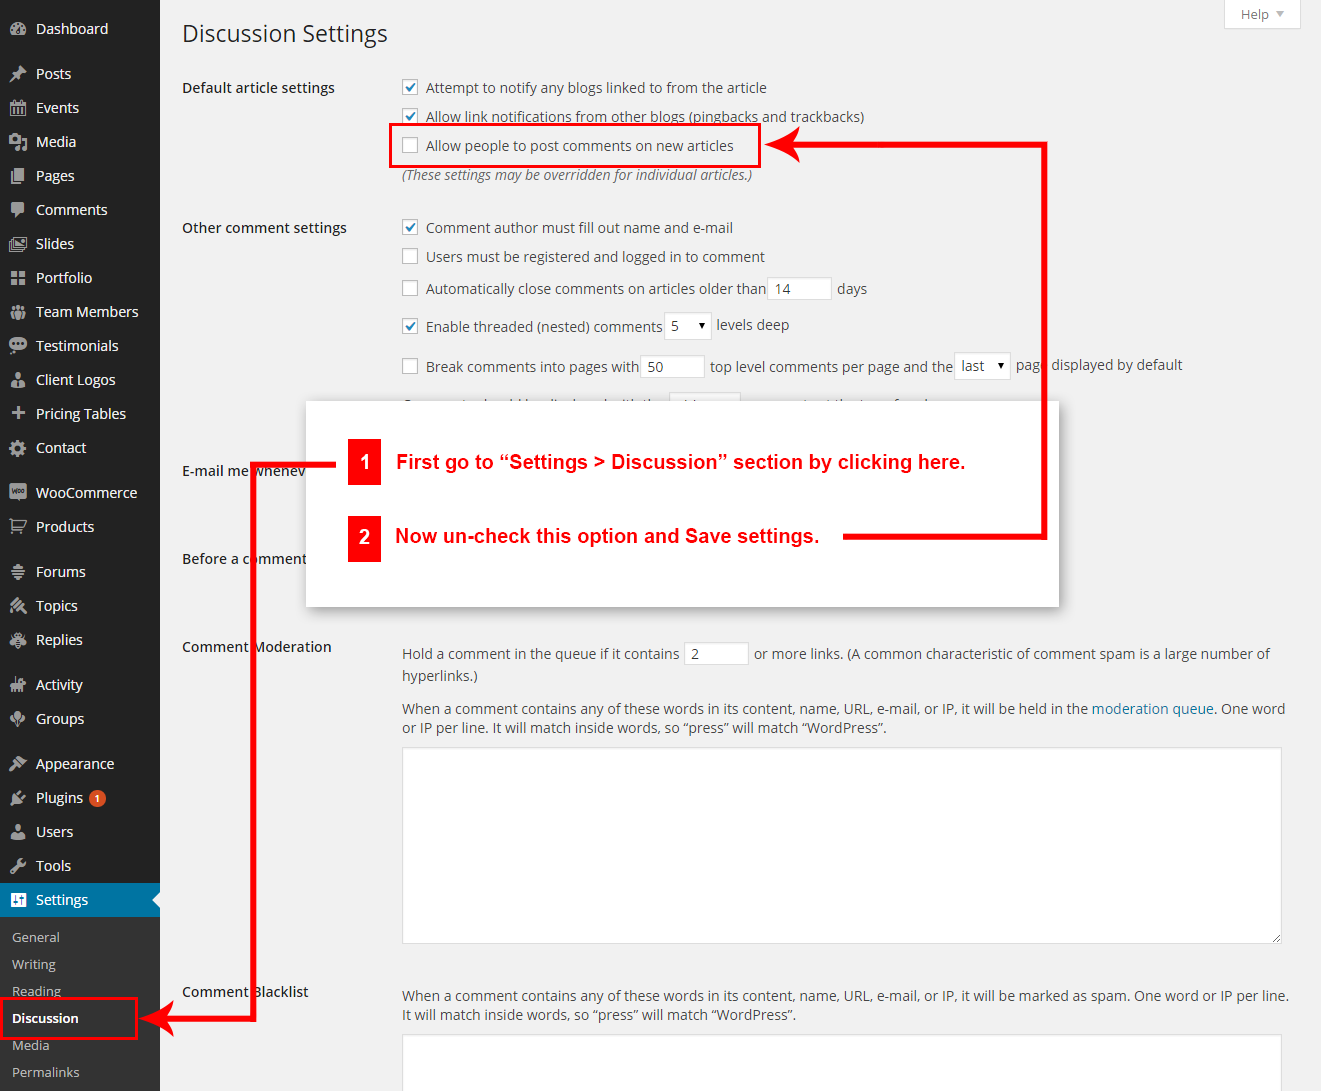
Q3: How to disable comments from PAGES (and also other post types) ?
A3: There are two steps to disable comments.
- First, disable comments from existing pages
- Second, disable comments from new pages so comments would be disabled on new pages too.
Here are steps to disable comments from existing pages:
Here are steps to disable comments from new pages (so comments would be disabled on new pages too) :
Q4: How to find Brivona theme Purchase Code ?
A4: The purchase code is a code that verifies that you are a genuine buyer. Here are steps to find your purchase code:- To find your licence key/purchase code you need to log into your ThemeForest account and go to your “Downloads” page:

- Now click on the Download button (next to the Brivona item) and click on the Licence certificate & purchase code link:
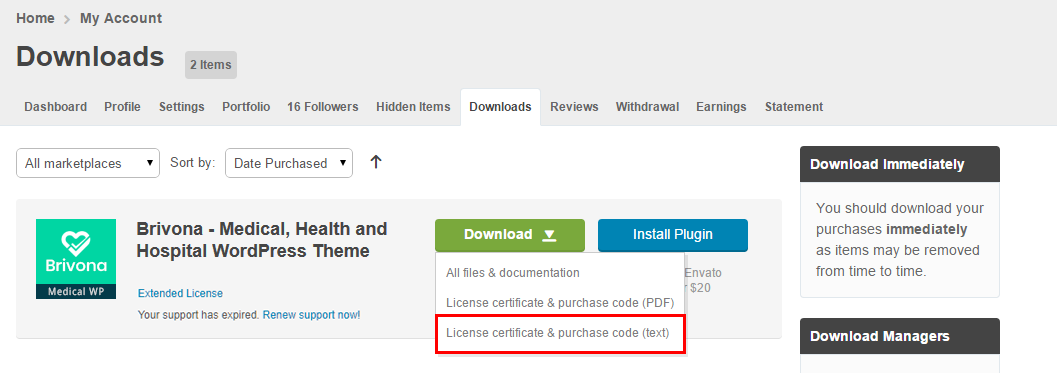
- You will get a text file to download. Just download it and open in text editor and you will find your purchase code:
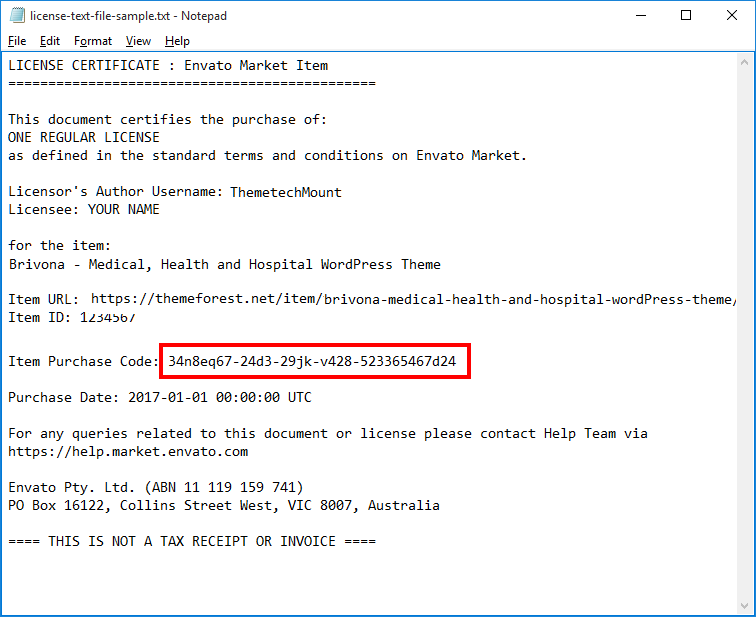
- Done
Q5: How to set responsive menu breakpoint (from which window size the menu will become responsive) ?
A5: You can set it from
Admin > Brivona Options > Menu Settings section. Just go to this section and select window size (or set pixel) under "Responsive Menu Breakpoint" option. See screenshot below: 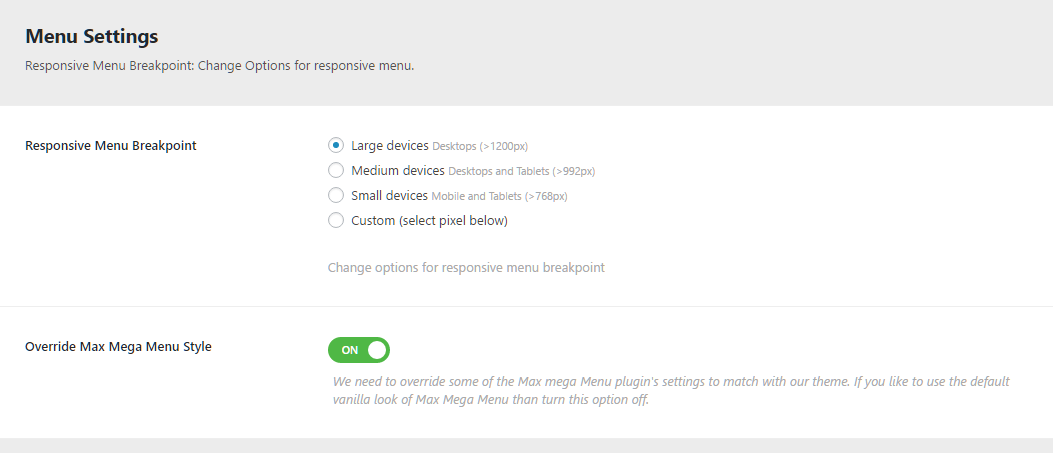
Q6: How to set MailChip newsletter form?
A6: We are using MailChimp for WordPress plugin to generate MailChip subscribe form in footer. So first install this plugin. Than follow steps given below:
- First make sure you link your MailChip account with this plugin. Just go to Admin > MailChip for WP plugin settings section and link your account. You just need to copy/paste the API code from your MailChimp account to here and click "Save Changes" button. See screenshot given below:
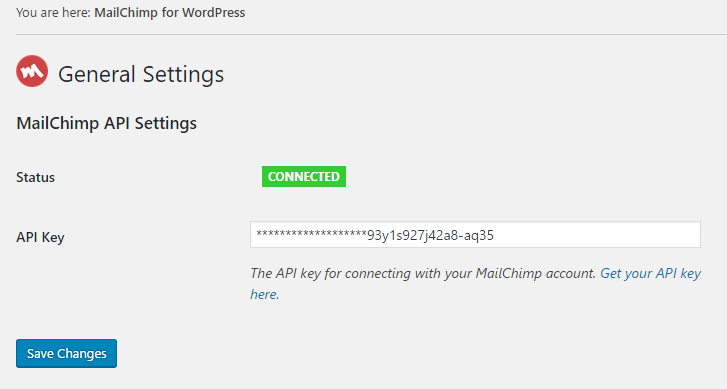
Now go to Admin > MailChip for WP > Forms section and paste this code:
<div class="tm_subscribe_form">
  <input type="email" name="EMAIL" placeholder="Enter Your Email" required />
  <button class="btn" type="submit">
  <i class="fa fa-envelope-o"></i>
  </button>
</div>
Like this:
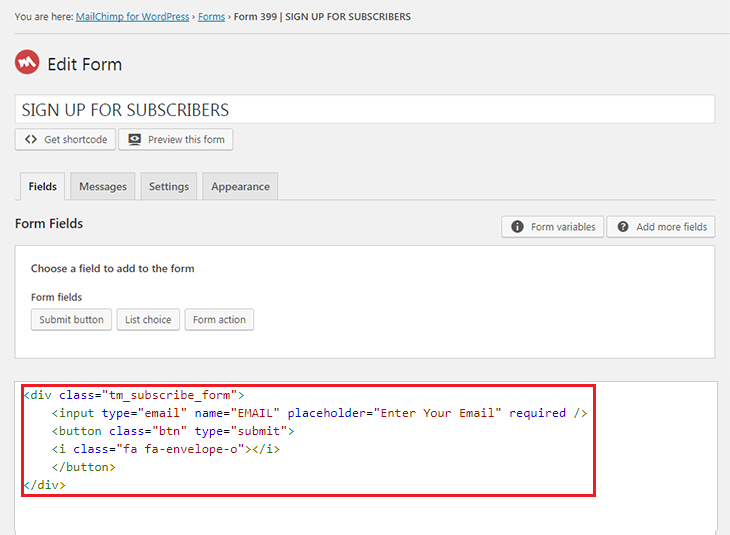
Q7: How to setup "Envato Market" plugin?
A7: You just need to link your themeforest.net account with the plugin. For this, you need API key from your account. This is one time process. After this setup done, you can install or update your purchased theme from here in just one click.
Please follow steps given below:
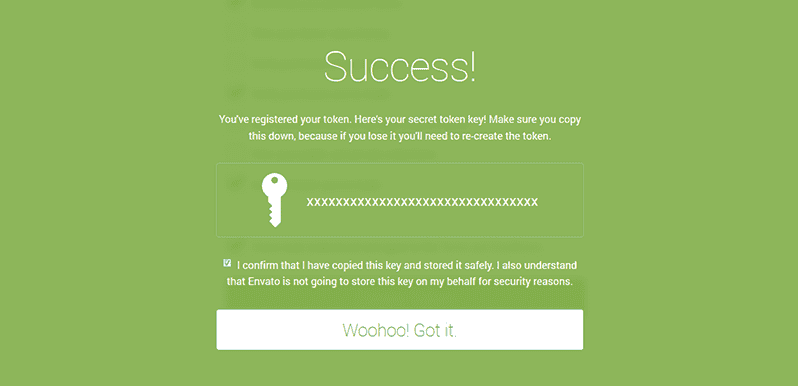
- From the dashboard’s Envato Market page, click “generate a personal token”.

- When you are taken to the Envato API page, enter a name of your choice into the Token name field.

- Agree to the terms, then click “Create Token” button.

- Once you’ve copied the token, check the confirmation checkbox and then click “Woohoo! Got it.” button.
- Return to the Envato Market page of the dashboard and enter your copied token, then click “Save Changes” button.
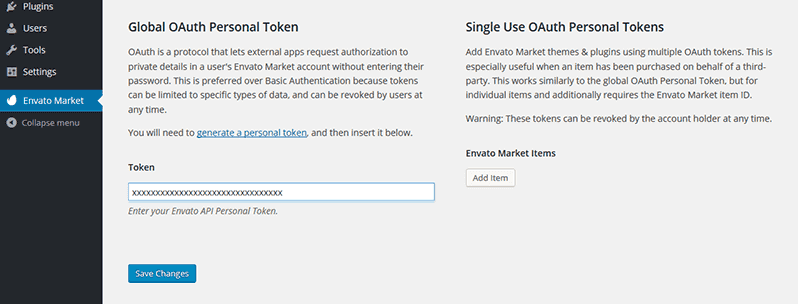
- When the overview of themes purchased on ThemeForest is displayed the Envato Market plugin setup process is complete.

- From now on, you can install or update theme easily in just one click.
Q8: How to set custom link (e.g. video link) open in lightbox alike display on Powered By Over section in Homepage 1 in Demo Site ?

A8: For this you just need to add an extra class name
tm_prettyphoto to the Icon Element. See screenshot below.
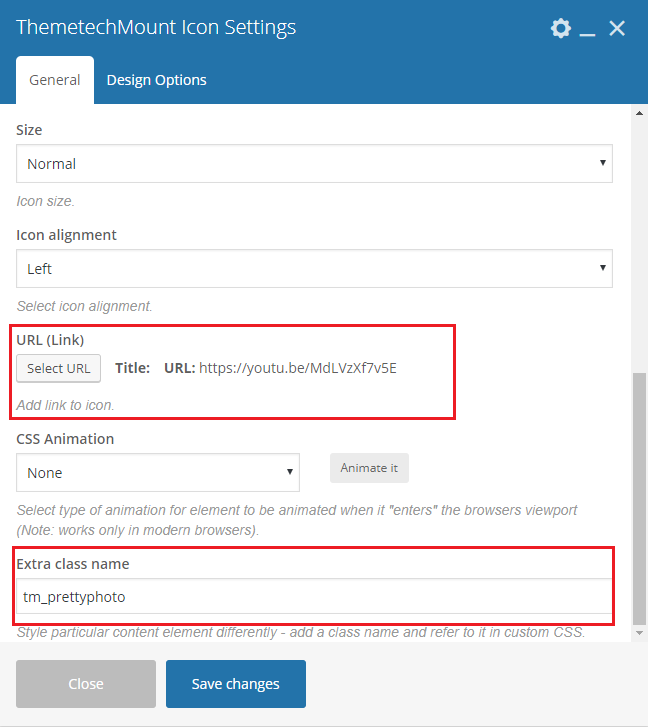
Q9: How to set link in header button alike Make Appointment button in Header in infostack Header style ?

A9: This button shortcode is part of Visual Composer Button Element. So you can copy the code generated by Visual Composer plugin directly. So just start to edit a new page and add your shortcode in it. Than set your button link via Visual Composer Button Element. Than go to "Classic Mode" and copy the shortcode an just paste it. Save your changes and it will be done. See screenshot below.
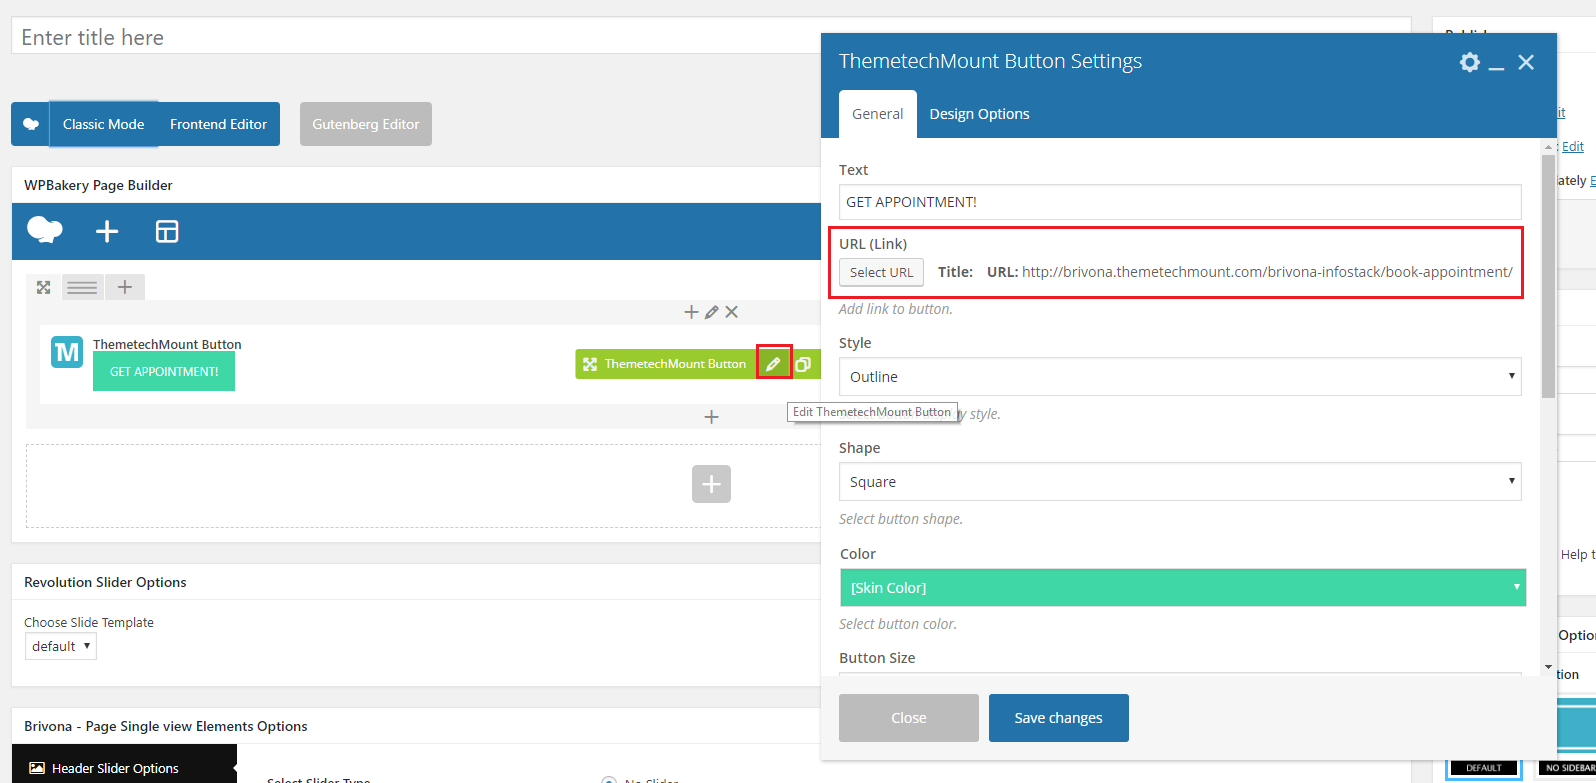
Q10: How to get same menu style as on Our Services menu ?
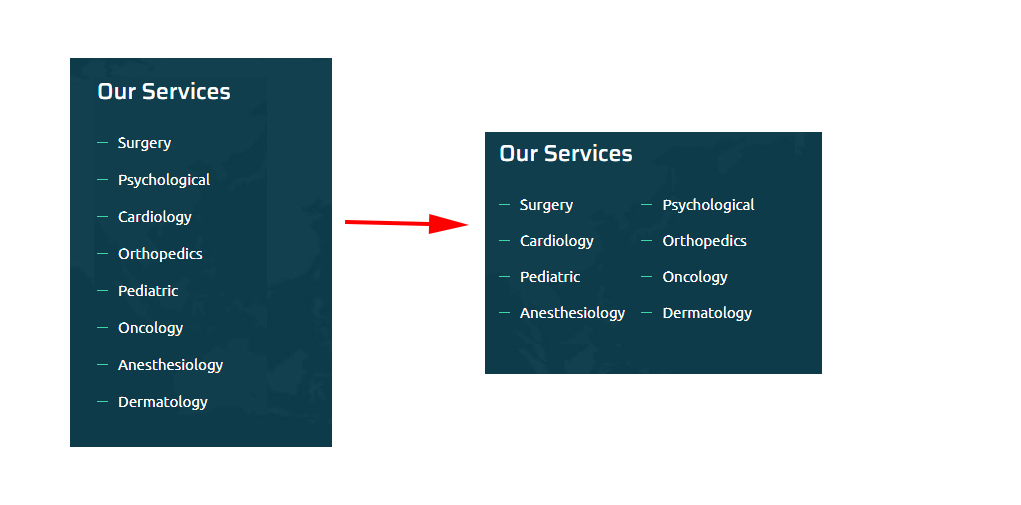
A10: To have same style as in Our Services menu, you just need to add a class in it. Here are steps:
First you need to install Widget CSS Classes plugin. This is free plugin and will add option to add custom class in Widgets.
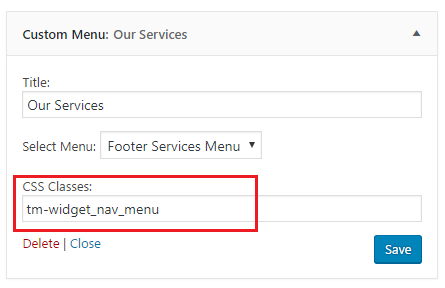
Now add "Custom Menu" widget in footer widget. Than write tm-widget_nav_menu class in the "CSS Classes" box. (Make sure you created menu from Appearance > Menus section and selected here) See screenshot below.
Q11: How to change dark black color in website ?
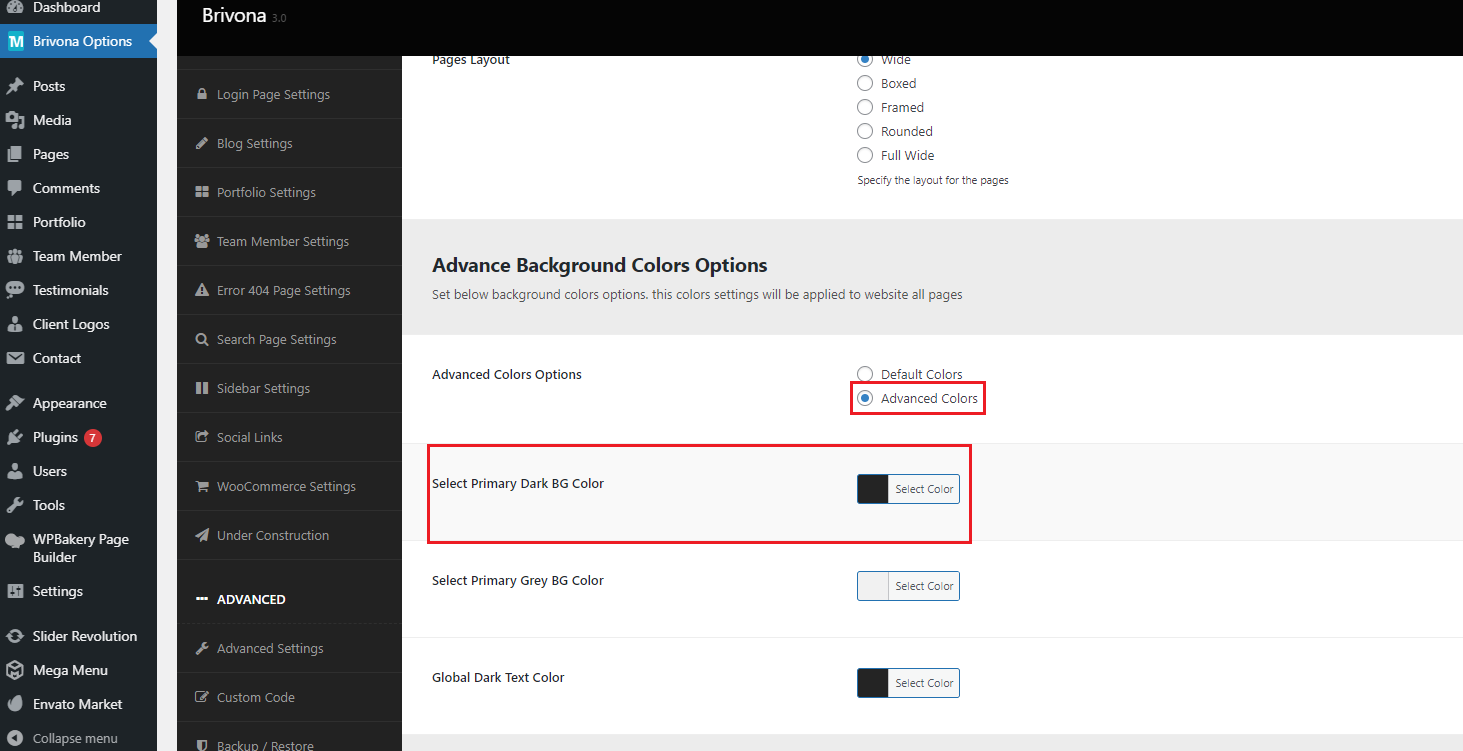
A11: To modify dark black & grey color in row & column bg just go to Admin > Brivona Options > Layout Settings.
Now select Advanced Colors Options to Advanced Colors and set your color code in Select Primary Dark BG Color option. Save your changes and it will be done.
Q12: How to change default button font size & top bottom padding ?
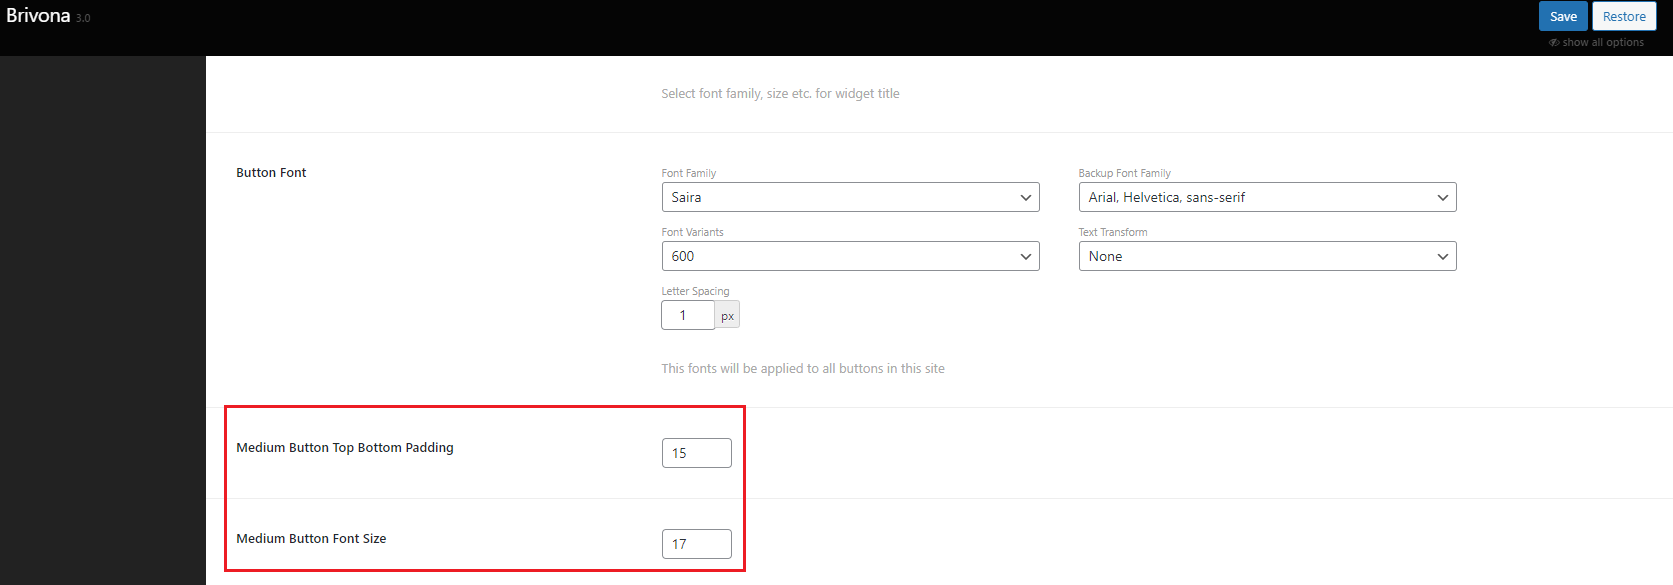
A12: To modify default button font size & button top, bototm spacing ust go to Admin > Brivona Options > Font Settings.
Now set font size & padding in Medium Button Top Bottom Padding & Medium Button Font Size options. Save your changes and it will be done.
